Get started in 60 seconds
Install the WordPress plugin, paste your API key, and pick a template — your first form is live in under a minute. This guide walks through every step with screenshots, plus the things people usually get stuck on.
Three things to do, then you’re shipping forms
Sign up for a free SecureSMTP account, install the plugin on your WordPress site, and connect the two with an API key. After that, the rest is the form-builder inside WordPress.
Install the plugin
Download v1.21.0 and upload it via Plugins → Add New → Upload Plugin.
Download zip →Paste your API key
Copy the key from /app/forms/api-keys and paste it in WordPress → QCS Forms → Settings.
Get my key →Step-by-step setup
~60 seconds end-to-end- 1
Create your SecureSMTP account
Head to securessmtp.com/signup and create an account. Email + password, or sign in with Google. The free tier covers 100 form submissions per month, forever — no credit card required.
Already have a SecureSMTP account? Log in.
- 2
Add your WordPress site in the dashboard
Open /app/forms/sites → click Add site → enter your site URL (e.g.
https://acme-marketing.com). SecureSMTP generates a per-site API key automatically — that’s what the WordPress plugin uses to authenticate.Why per-site keys? If a key leaks, you only have to rotate that one site, not your entire account.
- 3
Copy the API key
Go to /app/forms/api-keys. You’ll see the key for the site you just added (looks like
qcs_sk_live_a1b2c3...). Click the copy icon — keep this tab open, you’ll paste in WordPress shortly.Keep your key private. It’s a server-side credential — never paste it into a frontend file, never commit it to a public git repository.
- 4
Install the plugin in WordPress
Download qcs-form.zip (v1.21.0). In WordPress admin:
- Go to Plugins → Add New → Upload Plugin
- Click Choose File and pick the
qcs-form.zipyou just downloaded - Click Install Now, then Activate Plugin
After activation you’ll see a new SecureSMTP item in the WordPress sidebar.
- 5
Paste the API key in WordPress
In WordPress admin, go to QCS Forms → Settings. Paste your API key into the SecureSMTP API key field and click Save and test connection. You should see a green Connected to SecureSMTP banner with your site name, plan, and usage.
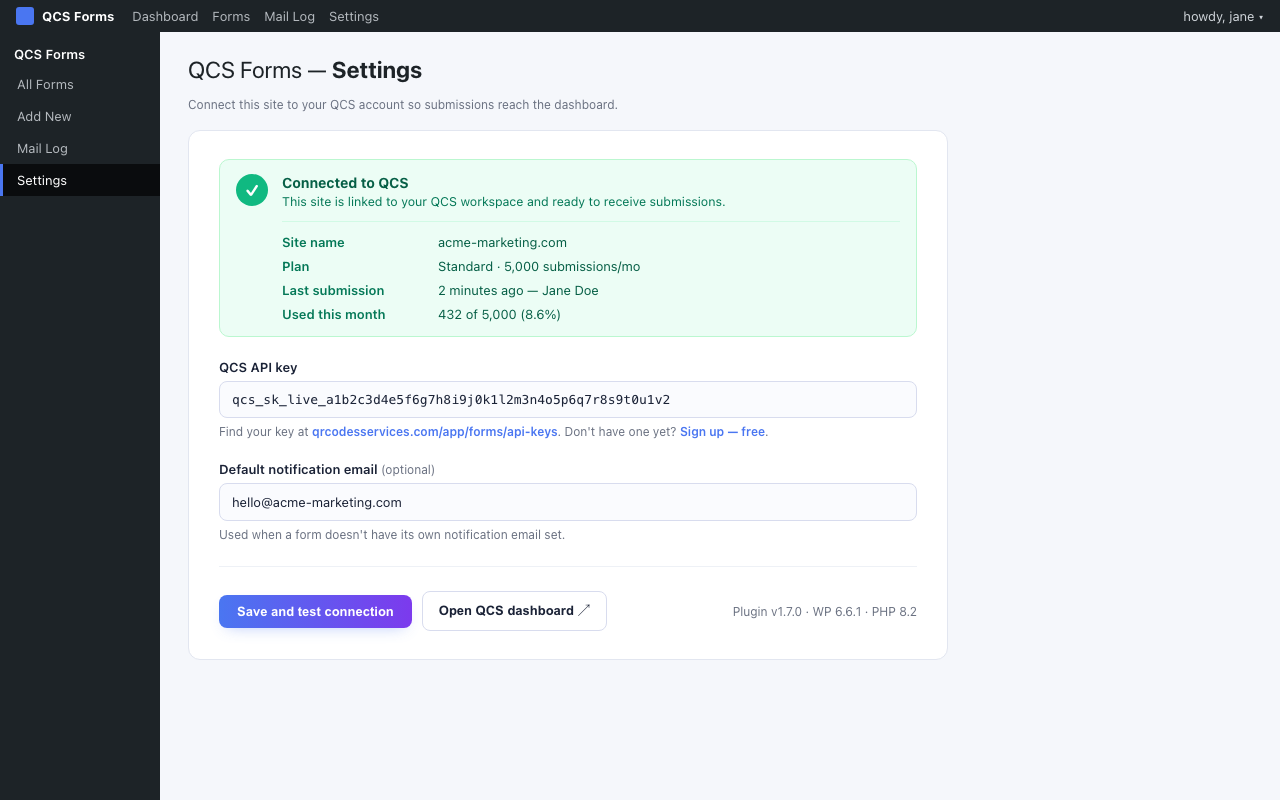
WordPress → QCS Forms → Settings, after pasting your API key That’s the whole setup. Everything below is about using the plugin to build and embed forms.
- 6
Create your first form from a template
In WordPress admin: QCS Forms → Add New. Pick from 13 ready-made templates — Contact, Quote, Newsletter, Demo, Booking, Support, Lead Magnet, Event RSVP, Job Application, Real Estate, Wedding, Restaurant Reservation, Feedback. You can always customise later, so just pick the closest one.
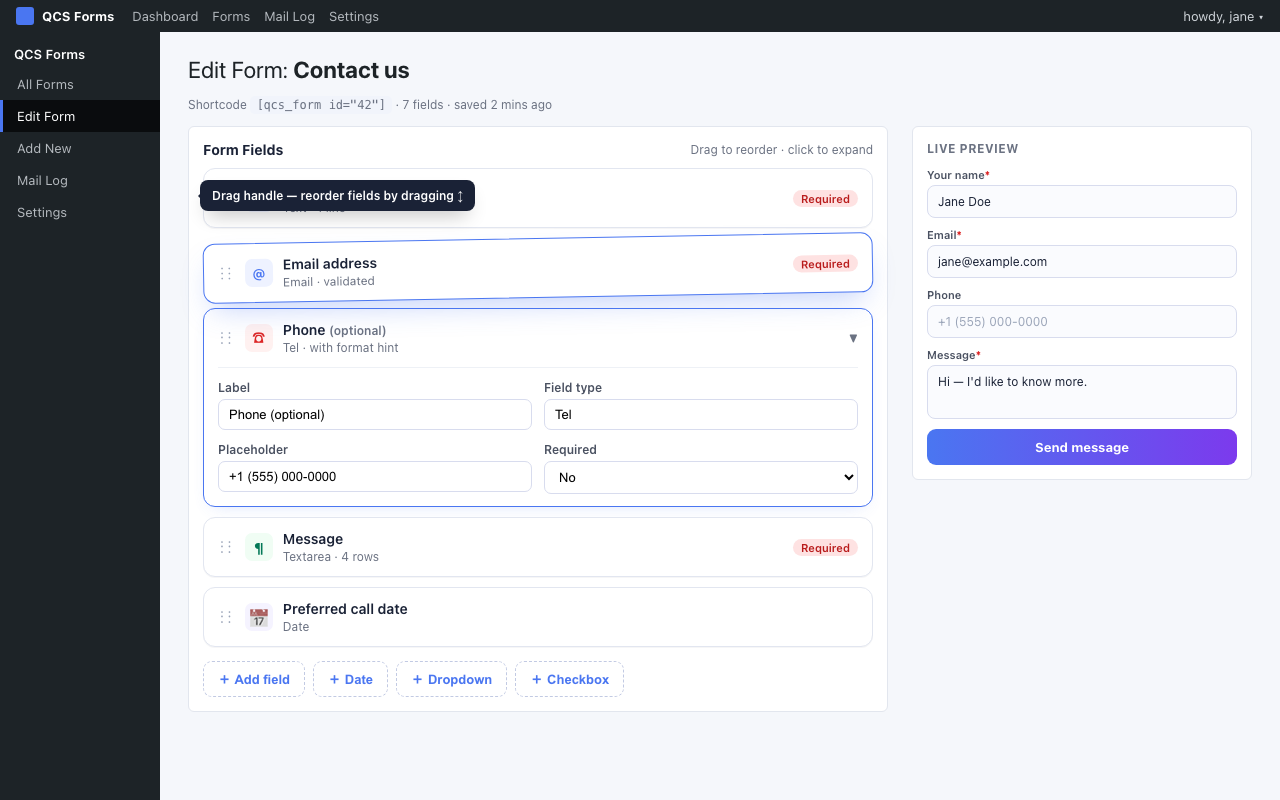
Drag-and-drop field editor — click any field to expand it, drag the handle to reorder - 7
Edit fields and style the form
Each field is a collapsible card. Click to expand the label / placeholder / required toggle. Drag the left-side handle to reorder. Need a different field type? Click + Add field.
The Design meta-box on the same page lets you pick a brand colour, corner radius, field background tone, button alignment, and an optional card wrapper. Live preview updates as you edit.
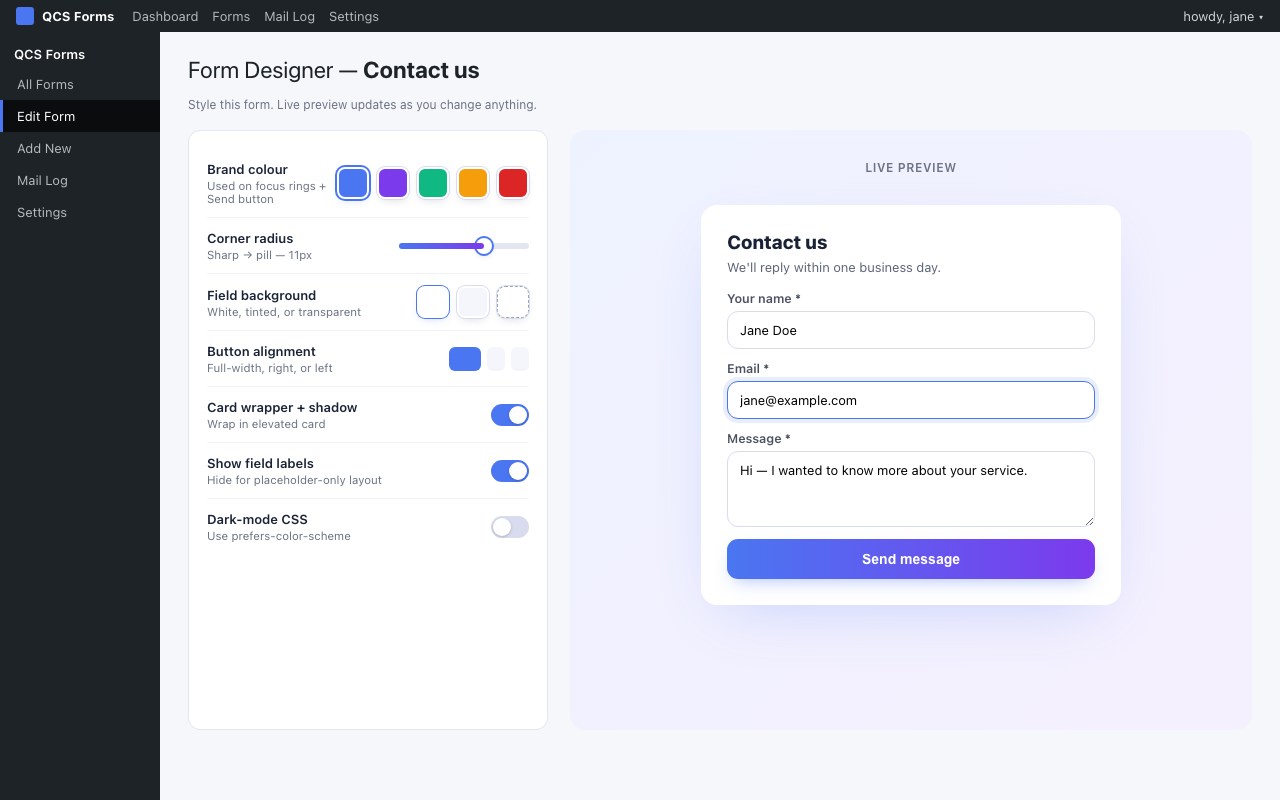
Design meta-box — change one setting and the live preview updates immediately - 8
Publish and copy your shortcode
Click Publish (top-right). The Embed meta-box in the sidebar shows the shortcode for this form — something like:
> [qcs_form id="42"]Paste that shortcode into any page or post — Gutenberg Shortcode block, Classic editor, page-builder shortcode widget, or even inside a theme template via
<?php echo do_shortcode('[qcs_form id="42"]'); ?>. - 9
Submit a test entry on the frontend
Visit the page where you embedded the shortcode. You should see the form rendered with the styling you picked. Fill it in and submit — within ~1 second the email lands in your notification inbox and the submission shows up in your SecureSMTP dashboard.
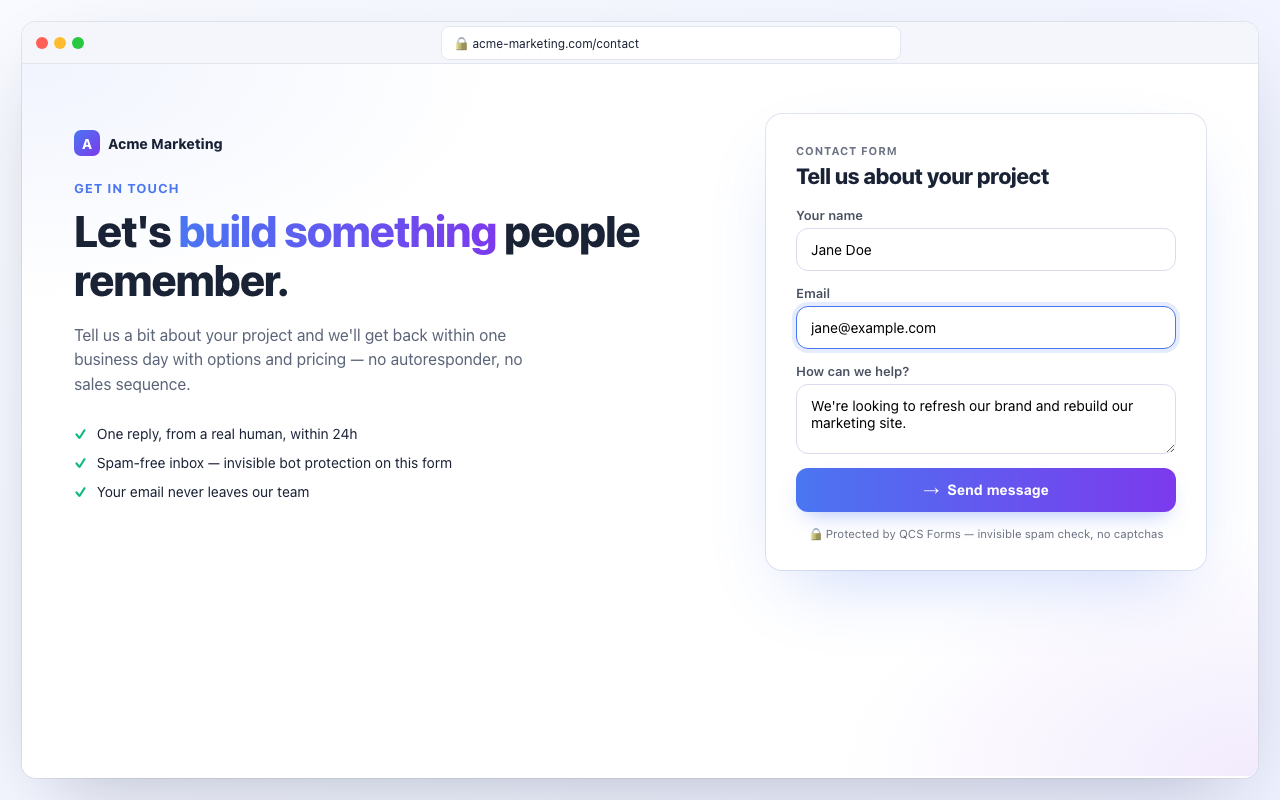
The rendered form on a customer-facing page — protected by invisible spam checks - 10
Review submissions in your dashboard
Open /app/forms/submissions to see every entry across all your sites. Each submission shows:
- The visitor’s name, email, and message
- An AI-generated classification (Genuine / Spam / Suspicious / Newsletter)
- A spam score (0.00 = clearly genuine, 1.00 = clearly spam)
- Email-delivery status (Delivered / Soft bounce / Held for review / Blocked)
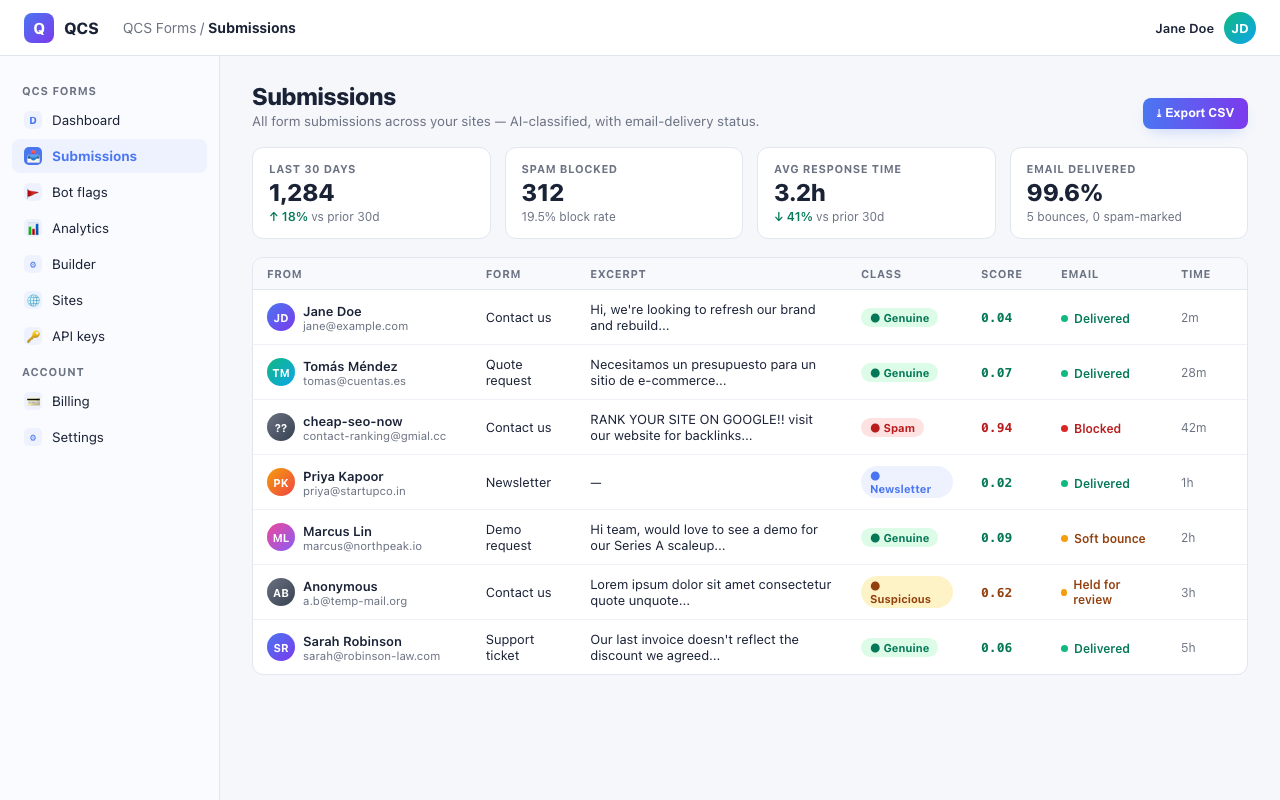
SecureSMTP dashboard — every submission, AI-classified, with email delivery status
Shortcode reference
SecureSMTP gives you two shortcode flavours. The one you use depends on whether you want the form definition stored in WordPress or in the SecureSMTP dashboard.
WordPress-native form
Form built inside WordPress via QCS Forms → Add New. Form lives in your WP database; you embed it by post ID.
The ID comes from the Embed meta-box on the form’s edit screen.
SecureSMTP-hosted form multi-site
Form built in the SecureSMTP dashboard at /app/forms/builder. One definition, embeddable on any number of sites — edit once, propagates everywhere within 5 minutes.
Particularly useful for agencies running the same form across multiple client sites.
Common questions
I clicked “Save and test connection” but I see a red error banner. What now?
securessmtp.com — rare, but check with your host or run curl -I https://securessmtp.com/api/v1/health from the WordPress server via SSH.My submissions show up in the dashboard but the email never arrives.
noreply@securessmtp.com via Resend, with SPF/DKIM/DMARC set up correctly — delivery is reliable to Gmail, Outlook, etc. Most likely the email is in your spam folder for the first one or two messages (until your inbox learns to trust the sender). The Mail Log inside WordPress (QCS Forms → Mail Log) shows delivery status — look for the Soft bounce / Hard bounce indicators.Do I need a paid plan to use the plugin?
Can I add the plugin to multiple WordPress sites under one SecureSMTP account?
What does the plugin actually send to securessmtp.com?
How do I uninstall cleanly?
uninstall.php cleans up. Submissions in your SecureSMTP dashboard are unaffected by the plugin removal; delete them individually from /app/forms/submissions if you want.Ready to ship your first form?
Sign up free — no credit card, 100 submissions a month forever. The whole flow above takes about a minute.